An agent can automatically capture columns and rows in a table using the Capture Table action. The Capture Table action automatically recognizes new columns and collect them after capturing several similar tables.
In the Agent Builder:
- Select Add Action.
- Select Capture Table.
Instructions on how to complete the action will display near the top left.
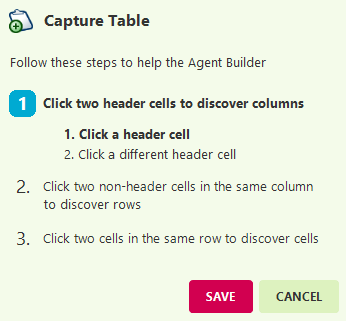
- Select a header cell on a table within the web page.
- Select another header cell.
- Select two non-header cells in the same column to discover row.
- Select two cells in the same row to discover cells.
- Select SAVE.
- The Capture Table List will now show in the Actions List along with the detected cells and rows.
Confirm that the captured table data displays in the Captured Text Preview window.
Managing Actions in a Table Capture List
-
Rename fields – By default, the agent columns in the output collection are named after the columns in the table. You can change a column name without affecting the accuracy of the collected data.
To do so:
Go to Actions List > Right-Click on the capture you want to rename > Select Properties > Enter a name for the field > Click** SAVE**. -
Refine List and Refine Capture Text – Limit which tables rows you harvest. To do so:
Go to Actions List > Right-Click on the capture you want to rename > Select Refine List when the capture is a list.
Or,
Select Refine Capture Text for the other captured items on the Table list.